Quick answer
To make DIY root tabs for aquarium plants, fill empty gel capsules with Osmocote controlled release fertilizer, poke a few small holes in the capsule with a needle, then press the capsule under water so it fills and sinks. Push each tab deep into the substrate near the roots of heavy root feeders like Cryptocoryne, Echinodorus and Amazon sword. A bag of Osmocote and a pack of capsules makes hundreds of tabs for a fraction of what store bought ones cost.
Store bought root tabs are one of those things you buy once, look at the price, and think there has to be a cheaper way.
There is. I have been making my own with Osmocote and empty gel capsules for a while now, and they do the same job for a tiny fraction of the cost. One container of Osmocote will outlast several tanks.
Here is exactly how I make them, including the one small step that most guides skip and that makes the difference between a tab that stays put and a tab that pops back up an hour later.
What root tabs actually do
Not every aquarium plant feeds the same way.
Some plants pull most of their nutrients out of the water column through their leaves. Anubias, Java fern, mosses and Bucephalandra all work this way, which is why they do fine attached to wood or rock with no substrate at all.
Other plants are root feeders. Cryptocoryne, Echinodorus, Amazon sword and most rosette plants send out real root systems and take up nutrients from the substrate. If you are running plain gravel or sand with no nutrient layer underneath, those roots are sitting in something that gives them nothing.
That is the gap root tabs fill. You are putting fertilizer directly where the roots can reach it, slowly, without dumping nutrients into the open water where algae can grab them.
Why Osmocote works for this
Osmocote is a controlled release garden fertilizer. Each little prill is coated, and the coating lets nutrients seep out slowly over months rather than all at once.
That slow release is exactly what you want buried in a substrate. A fast dissolving fertilizer would flood the water with nutrients in a day and feed an algae bloom. Osmocote drips it out gradually instead.
It also already contains the macronutrients your root feeders need, so you are not mixing separate salts and trying to balance them yourself. Cryptocoryne is also the plant most likely to melt when you first add it to a tank, which is a separate problem worth knowing about if you have just planted some.
What you need
- Osmocote controlled release fertilizer
- Empty gel capsules (one inch length, 8mm diameter)
- A needle or pin
- A cup of water
- Tweezers for planting them later
That is genuinely the whole list. No mixing, no clay, no drying time.
How I make them
1. Fill the capsule. Pull the capsule apart, fill the longer half almost 90% with Osmocote prills, and cap it back together. Do not pack it so tight that the two halves will not close properly.
2. Poke holes in the capsule. This is the step that matters. Take a needle and put a few small holes through the capsule shell.
3. Press it under water. Drop the capsule into a cup of water and press it gently. Water goes in through the pin holes and the trapped air comes out.
4. Let it sink. Once it has taken on water, the capsule sinks instead of floating.
That is it. I make a batch at a time and keep the rest dry in the capsule packet until I need them.
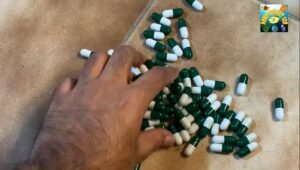
Here is the whole process if you would rather watch it than read it.
Why the pin holes matter
I have made these both ways, with holes and without, and the difference is not subtle.
A sealed capsule has air trapped inside it. When you push it down into your substrate, that air wants to come back up. The capsule works its way loose, floats to the surface, and you find it bobbing around the tank an hour later. If you have disturbed the substrate getting it back, you have made a mess for nothing.
A capsule with pin holes fills with water before it ever goes in the tank. There is no trapped air, so there is nothing pushing it back up. It stays where you put it and the shell dissolves quietly over the next day or so, leaving the prills sitting in the substrate exactly where the roots are.
Most guides tell you to make the tabs and skip straight to planting them. If yours keep floating up, this is why.
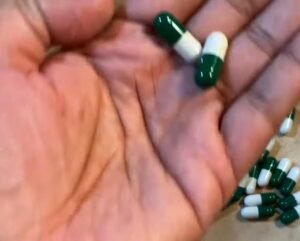
My results after four months
I have been using these in my own tanks for about four to five months now, and the difference in the plants has been clear. Colors came in much brighter, growth picked up noticeably, and the plants generally look healthier than they did before. My tanks have also stayed algae free through that period, which I think comes down to the nutrients staying locked in the substrate instead of leaking into the water column.
How to put them in the substrate
Use tweezers rather than your fingers if you can. Long aquascaping tweezers let you push a tab deep without digging a crater in your substrate.
Push it deep, not just under the surface. You want it down at root level, and you want enough substrate above it that nothing leaches straight up into the water column.
Place tabs near the base of your root feeders rather than scattering them evenly across the tank. There is no point feeding an empty corner.
Go gently. The more you stir up the substrate, the more nutrients escape into open water, and that is what feeds algae.
How often to replace them
Osmocote releases over 4 to 5 months rather than weeks, so you are not doing this often.
The honest answer is that it depends on your substrate, your plant load and your temperature, since warmer water speeds up the release. Rather than following a fixed schedule, watch the plants. When growth on your root feeders slows down and older leaves start looking pale or yellow, that is your signal to add a fresh tab near the base.Pale or yellow leaves can have other causes too, so it is worth checking the pattern against the other aquarium plant deficiency symptoms before you assume it is the tabs running out.
Mistakes to avoid
Overdosing. More tabs does not mean faster growth. It means excess nutrients leaching into the water and an algae bloom. Start with a small number and add more only if the plants tell you they need it.
Putting them under water column feeders. There is no benefit to burying a tab under Anubias or Java fern. Those plants feed through their leaves, and their rhizome should never be buried anyway.
Burying the rhizome is the bigger risk here. A buried Anubias rhizome rots, and rhizome rot is a genuine problem rather than just slow growth.
Burying them too shallow. A tab sitting just under the surface leaks straight into the water. Push it properly down.
Disturbing them later. If you uproot a plant that has tabs near it, expect some nutrients to release into the water. Do a water change afterwards if you have stirred things up badly.Stirring up the substrate can also push detritus worms into the water column, which is harmless but alarming if you do not know what they are.
Using the wrong fertilizer. Regular water soluble plant food is not a substitute. It dissolves immediately and goes straight into your water column. The controlled release coating is the entire point.
[faq]
Q: Is Osmocote safe for aquarium fish?
A: Osmocote is widely used by planted tank keepers as a DIY root tab. The key is keeping it buried in the substrate rather than loose in the water, and not overdosing. Push tabs deep, avoid disturbing them, and start with a small amount rather than filling the tank with them.
Q: How many root tabs do I need?
A:Fewer than you think. Place them near the base of heavy root feeders rather than spacing them evenly across the whole substrate. Adding too many at once risks nutrients leaching into the water column and feeding algae.
Q: Why do my root tabs keep floating up?
A:Almost always trapped air. If you fill a gel capsule and push it straight into the substrate while it is still sealed, the air inside will lift it back out. Poke a few pin holes and press it under water first so it fills and sinks before planting.
Q: Do all aquarium plants need root tabs?
A: No. Only root feeders benefit, like Cryptocoryne, Echinodorus and Amazon sword. Plants such as Anubias, Java fern, Bucephalandra and mosses take nutrients from the water column through their leaves, so a buried tab does nothing for them.
Q: Are DIY root tabs cheaper than store bought?
A: Considerably. A single container of Osmocote and a pack of empty gel capsules will make a large number of tabs, and the ingredients last a long time. This is one of the easiest DIY swaps in the planted tank hobby.
Q: Can I use gel capsules from a pharmacy?
A: Yes, empty gelatin capsules are exactly what you want. The shell dissolves in water within a day or so and leaves the prills behind in your substrate.
[/faq]
Final word
DIY root tabs are one of those jobs that takes ten minutes and saves you money for the next year. Fill the capsule, poke the holes, press it under water, push it deep into the substrate near your root feeders.
The pin hole step is the one I would not skip. It is the difference between a tab that stays buried and doing the whole job twice.
0 Comments